Streamline your process to save time and get more exposure
WARNING - This is a very tech-loaded blog and will bore you to death unless you were like me and looking for this type of information when going through the process of getting on stock websites.
Whether you are already selling stock photos and videos or if you have not and want to know if you should and what is involved - this blog is going to help you out. My background in stock photography goes back to where I first messed around in my early photography career, nearly a decade ago. Back then, I used a couple of different platforms, such as 500px and iStock Photo. It didn’t really register as a useful source of income starting out, and I eventually let them fade away.
Then, about 3 or 4 years ago, I decided to give it another shot. I had a lot more images in my portfolio, and they were just sitting around collecting dust (other than occasionally selling physical prints). I decided to give Adobe Stock a try, and to be honest, I have been very happy with the results! They have a very good platform for managing your images. Primarily, their magic is helping generate keywords for you automatically - a blessing I didn’t recognize until more recently.
Now let’s go back to fall of 2021 - I was making a consistent amount from my Adobe Stock portfolio each month and wondered if there were any other platforms that might get similar results with the same collection. However, I knew it would be a TON of work to open new stock accounts. Every image needs several components on a stock site, and I found most sites make you do all of this manually.
Necessary Components:
- Title - A well thought out title that thoroughly describes the image
- Keywords - While Adobe helped with this, most stock sites do not. The more keywords the better. This is key to your image being found.
- Description - Some require a unique description, though you can often use your already descriptive title.
- Categories - Most do automate this, nonetheless a category does need to be identified at some point.
No big deal if you are doing this as you go. But if you are jumping in with two or three thousand images - it can be daunting.
SO - where am I going with this? I wanted to share the full process that I went through last fall to ultimately get an entire collection of roughly 4,200 images submitted smoothly to 18 different stock websites. Yes, I went from only Adobe to using 18!
Step One: Preparing your files
As I said before, there are titles, keywords, descriptions, and categories that need formatting. I have developed a proprietary process that automates all of this for you. For just $9.99 a month…JUST KIDDING. But really, I did spend a bit of time refining a process with ONE goal in mind - Taking 100% control of all 4 of these variables so that I could easily add another stock website without having to do any steps all over again.
This entire process can be FREE for you - so long as you already have Adobe Lightroom in your possession. As a photographer, you likely already have an Adobe license and may or may not already have Lightroom. The rest “can” be free from there (it really only costs more if you want to speed up certain steps in the process).
Develop your Title
For this, you have to grind. This is done manually, and what I do is simply rename the file itself to be the title I want on stock websites. If you prefer to keep your original file name preserved, you can in fact use Adobe Lightroom to give each file a “title” that doesn’t replace the filename. Spend time developing a good 50 to 70 characters in length title.
Spellcheck! This I highly recommend. There is a bulk shortcut to find typos, believe it or not. In Windows Explorer, use Ctrl+A to select all of your images. Now, HOLD SHIFT down and right click on any image and select “Copy as Path”. You can now paste into Excel your entire list. Use find and replace to remove the source URL from the front. THis will leave you just with your file names (aka Titles with potential typos). Now, paste that into Word and let spellcheck find issues. You will have to manually fix typos you find, but this is the fastest methodI have found for finding typos in filenames of images on Windows.
Build your Keywords
This is the most painful part, but it’s also the most important. You can add keywords in Lightroom. One way to speed this up is by using a handy little plugin called Wordroom. It will use AI to look at your image and give you 30 keyword suggestions. You can then add them to that image, after adding/removing any you want.
I wish it would let you auto add all 30 to a bunch of images at ONCE - but unfortunately you do have to go one at a time. Setting up Wordroom is free, including the required AI account it uses via Imagga (this is limited to 1000 images per month - so this is where you can speed up the process if you want to pay to process more images in a month).
If you want to get EXTRA fancy, you can go even more advanced. I found using Wordroom to have one odd glitch on occasion - and perhaps this is just me. Once it is open and you add your keywords to your image, you can click to go to the “next image”. I found sometimes this would say there were no more images left - which was incorrect. So I had to keep closing out the Wordroom popup and reopening it. This is about 5 seconds of time. Adds up for 4,000 images!
Solution - AutoHotKey. This is a program for Windows that, with relative ease, you can program a series of actions with a shortcode. For me, pressing Ctrl+q would automate the process of adding all keywords, closing the popup, going back into the menu a few levels and reopening the program, and being ready to add again. I could then just review the keywords it suggested in Wordproom, press ctrl+q and BAM - wait about 1-2 seconds and it would have the next image consistently pulled up.
Don’t forget to SAVE
Once you have all your keywords in, and IF you also put your titles in via Lightroom instead of renaming the original file - You will want to select all your images in Lightroom, right click, and “Save metadata to files”. This is VERY important. This step saves your data IN the files, whether you have Lightroom or not.
Formatting Videos
Before I get too far along, videos are a bit…different. In many ways the above process is the same, but not quite:
- Length - First of all, most platforms want clips that are 15 to 60 seconds in length. You will want to trim your clips to that range and do VERY basic adjustments to colors/exposures. They want it as natural/raw as possible. If you have a ton of videos and Adobe Premiere at your fingertips - you can look into nested sequences to quickly put each clip in its own sequence (after trimming/edits), and then batch export them all.
- Title - This can be the same process as with photos.
- Keywords - Unfortunately, video files don’t “save” keywords to files like photos. Fortunately, you can still do the full Wordroom process in Lightroom to add the keywords there. But then, you ask, how do you save these keywords for your use? One more plugin you will need (not free but not very expensive either) - Listview. This is needed to fill a gap in a feature I think should be built into Lightroom, but currently isn’t. What you are wanting to do is export a CSV file that has a list of your video files and all of your keywords. You will then, in the next steps, be able to pair that CSV with your video uploads to get those keywords added. It is a bit more complicated and requires some formatting of that CSV file, but that is the quick summary.
Resizing Photos
One issue with some platforms is file size. You DO want to give nice large images. However, some (like 123rf and Bigstock) require them to be no larger than 25mb. You can consider keeping ALL images under 25mb and then have no issues, or you can just not submit those larger images to platforms that have issues with it.
Create descriptions
Not going to lie, my process gets tricksy here. Since some platforms require a unique description, I take the existing title and add “Image of…” or “Video of…” to the front. I do this since my title is already very descriptive.
HOW I do this requires another CSV file. For videos, you already have that CSV for your keywords. You can simply add a column for the description. I won’t go into the formulas but in short, you can make a temporary column that says “Image of” or “Video of” and then write a formula in the description column that will automatically pair the text of that column with the title column. After that, you want to copy that finalized column into a separate file and paste back as “plain text” so the final output isn’t “built” by a formula.
The same process needs done for photos, but you FIRST need your CSV file. This is surprisingly easy…barely an inconvenience (shoutout to Screen Rant Pitch Meetings). However, you can’t do this step yet…stay tuned in a future section.
What about Categories?
This is one I give to the collection platform I am going to recommend, which does automate this. You can export that data at any time if you want to localize it and keep control of it (which I do).
Comment below if you get stuck anywhere in these steps and have more detailed questions!
Step Two: Get your photos/videos into a collection platform
Alright, you have titles and keywords set (as well as descriptions for videos). What next? This is the REAL magic sauce now - Microstock Plus (not a sponsor). This is FREE to use for up to 200 uploads a month and a certain amount of storage. You can do what I did, which was to pay for unlimited uploads for the first month or two until getting my collection caught up. After that, I switched back to the free version as I also didn’t need more capabilities.
What is Microstock Plus? Think of it as a file manager for your entire stock collection - a manager that can let you make sure all titles/descriptions/keywords/categories are in place and then it can submit them FOR YOU to all 18+ stock websites.
Yes…that is correct.
So - without making this blog into a novella - let me try to summarize the next steps very briefly.
You will either upload directly or via FTP (I recommend Filezilla FTP) your full images/videos to Microstock Plus. It will now have your titles and keywords for photos and figure out categories for photos/videos. I recommend doing batches of photos separate from videos, as the processing in the next step is different for them. But you can make folders in Microstock Plus to manage collections as well.
Image Descriptions
Out of the box, with the steps you already have done, you have everything ready for your images except for descriptions. In Microstock Plus, you can export a CSV of your image list. Then, use the same process as we did for video descriptions in Excel to add that description column. Then, go back to Microstock Plus and import that same CSV file back and it will add those descriptions for you.
Video Keywords and Descriptions
Remember the part with the CSV and needing those keywords? You can now, in Microstock Plus, go to the folder with your videos and upload your CSV. So long as there are columns for the filename, title, descriptions, and keywords, Microstock plus will find the corresponding file and add those descriptions and keywords for you.
Step Three: Setting up the Stock Sites and Submitting
Now, you have all of your images and videos in Microstock Plus with nicely formatted titles, keywords, descriptions, and categories automatically added for you.
You are READY to get LISTED on stock websites.
Which stock websites should I use?
This is a personal decision and really depends on your mindset for how much money you want to make per image. Platforms like Adobe Stock pay a good amount per image (60 cents up to $3 in some cases depending on the downloader's subscription), whereas microstock websites like Freepik only get you around 10 cents per image.
Why use a microstock site at all then? In short - more downloads. You may get 5 to 10 times more downloads from Freepik, which may mean the same profits as Adobe.
But, do you WANT to sell your images for just 10 cents? That is a decision for you. You could consider only submitting certain images to microstock sites, saving your better images for places like Adobe.
At some point, as a photographer, you have to decide if you want to get as much for each image as you can or instead go for bulk - getting thousands of downloads. Your image is getting out there more and getting used by more artists - and that can be good or bad depending on how you feel about it.
Creating Stock Accounts
This part can be a grind - but it is a one time thing. You’ll need to decide, of the stock platforms that Microstock Plus supports, which ones you actually want to use. From there, you DO have to go to each of those platforms and set up your contributors account.
After that, you give Microstock Plus your credentials to those platforms.
I can save you SOME time on this. There is a long list on Microstock Plus as of January 2022, but I found the list of 18 below to be viable ones:
- 123RF
- 500px
- Adobe Stock
- Alamy
- Bigstock
- Can Stock Photo
- Canva
- Depositphotos
- Dissolve (only supports videos in Microstock Plus)
- Dreamstime
- EyeEm Photographer
- Freepik
- MotionElements
- PIXTA
- Pond5
- Shutterstock
- Video Hive
- Yayimages
The process for each varies. You may have to submit samples, wait for acceptance, figure out tax documents, etc…Be patient and work through this one time process of creating the accounts you want.
Time to submit your images and videos!
Now, all your hard work FINALLY pays off. The step here for 18 stock platforms that normally would require to go to EACH platform, upload your files, set titles, keywords, descriptions, and potentially categories, now gets all done at once by Microstock Plus.
Just go in, select the images/videos that are ready - and use Microstock Plus to submit them to whatever platforms you want. This is where you can decide if some images won’t be submitted to some platforms.
Final Thoughts
This is my process, as someone NEW to being on multiple stock platforms. I would love to hear from any other stock contributors on how their process is different or any tips to improve my process. I’ll end this post by sharing with you, for those curious, the top 10 most downloaded stock photos in my collection, according to Adobe Stock.
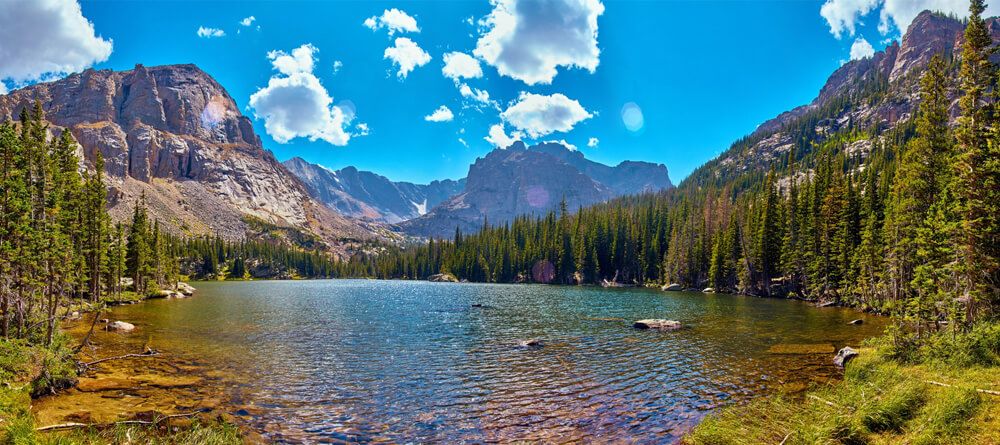
#1 Seller - The Loch Lake in Rocky Mountains Landscape Pine Trees

#2 Seller - Fort Wayne Downtown Skyline

#3 Seller - Abstract Milk, Paint, Oil Bubbles Experiment Texture
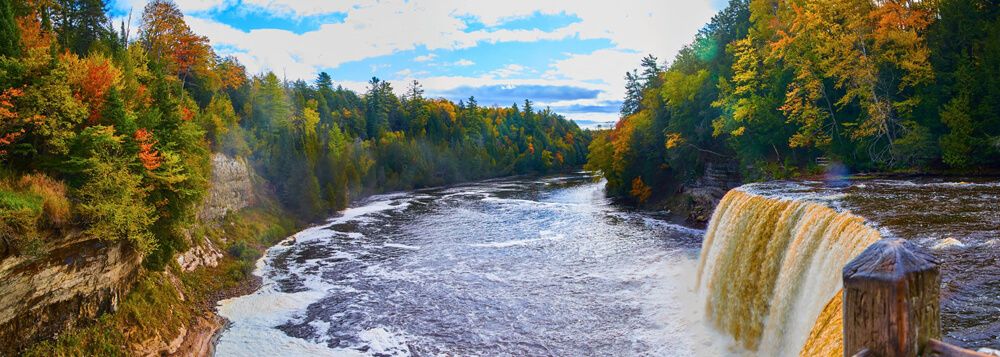
#4 Seller - Panorama Tahquamenon Falls Waterfall Wide Angle
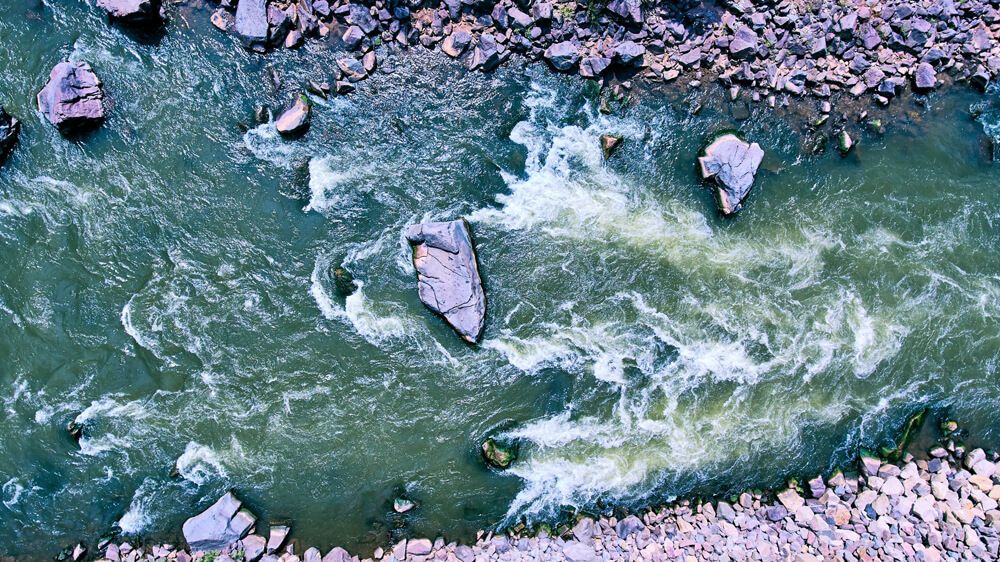
#5 Seller - Colorado River Rapids rocks
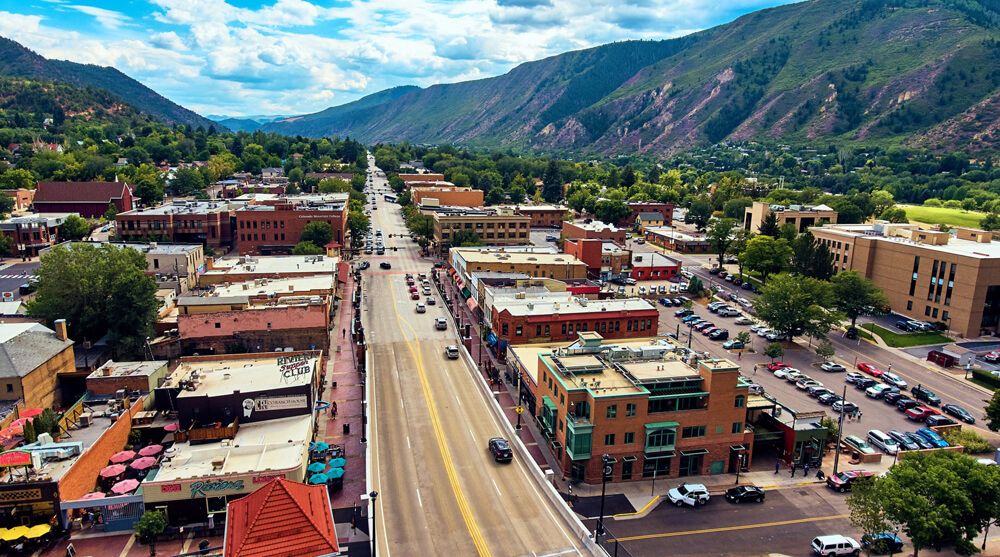
#6 Seller - Aerial Glenwood Springs Rocky Mountains
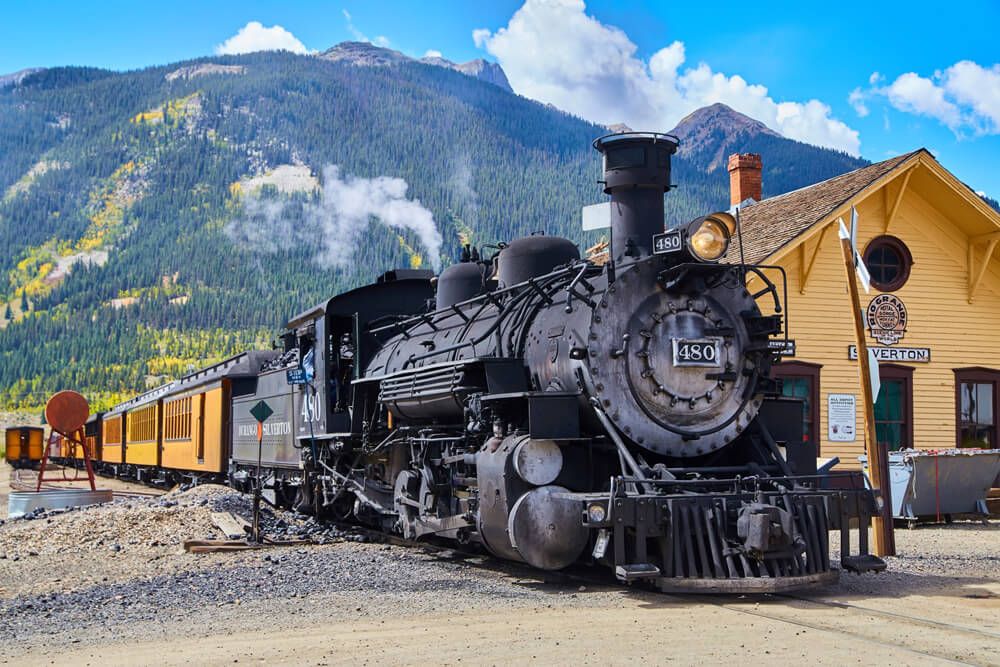
#7 Seller - Old Train 1800's Coal Powered in Mountains
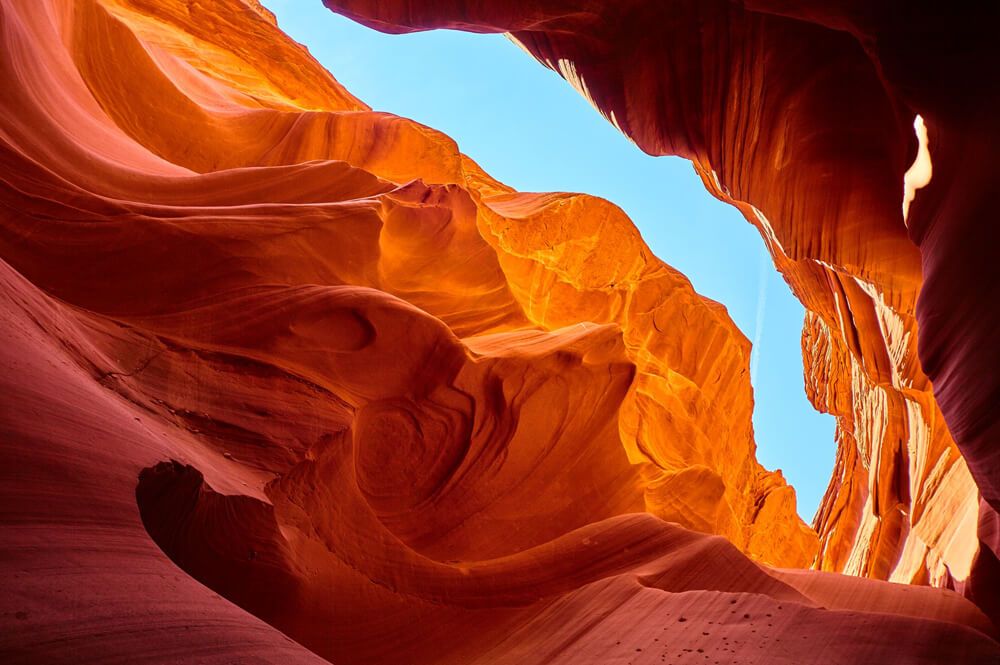
#8 Seller - Antelope Canyon in Arizona Landscapes

#9 Seller - Courthouse Building Evansville
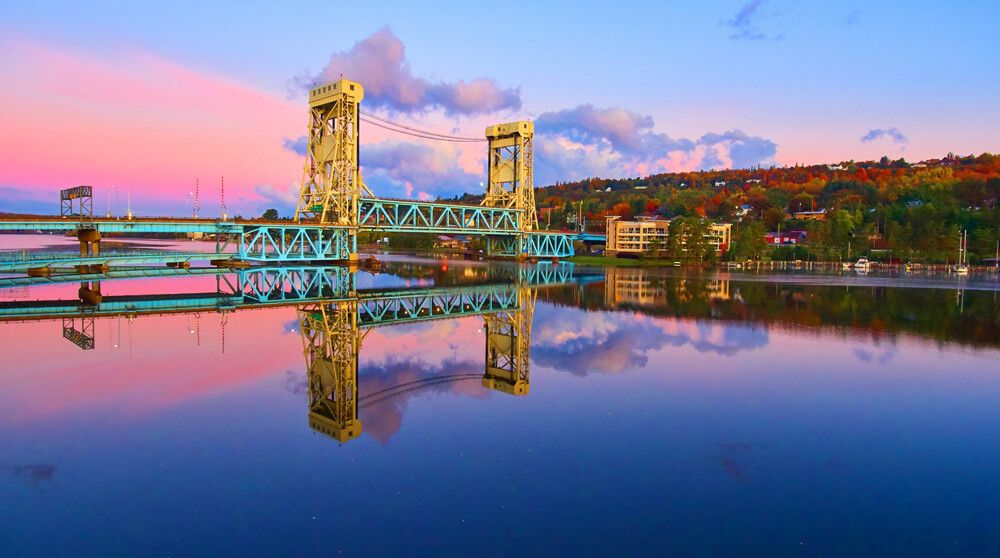
#10 Seller - Houghton Lift Bridge in Michigan Fall on River Harbor Sunrise Small Town


About the Author
Founder and visual artist, specializing in all aspects of a businesses presence from imagery and video to graphics and web. A graduate of IPFW with a Bachelor in Fine Arts, Concentration Photography as well as an Associates Degree in Business. His personal photography works are focused on landscape, travel, and aerial photography.